Azure Entra ID SAML
Route4Me’s SAML SSO Integration enables you to log into Service Provider websites, such as Route4Me, with your existing user identity from your own website or app, such as Azure. Creating an app integration between Route4Me and Azure is a straightforward process. In this guide, you can learn how to create an Azure SAML integration with Route4Me, choose your preferred settings, and more. Additionally, you can learn how to set your preferred SSO (Single Sign-On) settings.
Retrieve Service Provider Configuration Data
Service Provider configuration data is required to connect the Service Provider (SP) to the Identity Provider (IdP). This configuration includes details such as the SP’s “entity_id“, SAML assertion consumer URL, and certificate.
To do so, first send a “POST” request to the Service Provider configuration endpoint (https://wh.route4me.com/modules/api/v5.0/saml/) to create a new Identity Provider and get the Service Provider Configuration like in the example below:
curl --location --request POST 'https://wh.route4me.com/modules/api/v5.0/saml' \
--header 'Accept: application/json' \
--header 'Content-Type: application/json' \
--header 'Authorization: Bearer YOUR_API_KEY'
Then, you should receive the following expected response:
{
  "configuration_id": "0196E841475970D589E15DA2A5CECAD5",
  "sp_config": {
    "entity_id": "https://route4me.com",
    "assertion_consumer_service_url": "https://wh.route4me.com/modules/api/v5.0/saml/acs/………",
    "x509_cert": "MIID…..pHM=",
    "metadata_url": "https://wh.route4me.com/modules/api/v5.0/saml/metadata/……"
  },
  "idp_config": {
    "entity_id": null,
    "single_sign_on_service": null,
    "x509_cert": null
  }
}
In detail, the parameters in the response correspond to the following data:
- entity_id: Unique identifier of the Service Provider.
NOTE: You’ll need the “entity_id” for Entra ID (Azura) SAML configuration later. - assertion_consumer_service_url: Endpoint where SAML assertions will be sent by the Identity Provider.
NOTE: You’ll need the “assertion_consumer_service_url” for Entra ID (Azura) SAML configuration later. - certificate (cert): Public certificate for encryption or validation.
- metadata_url: Endpoint for downloading the Service Provider’s metadata XML.
Route4Me Azure Application Setup – Create Route4Me Enterprise Application On Microsoft Entra ID
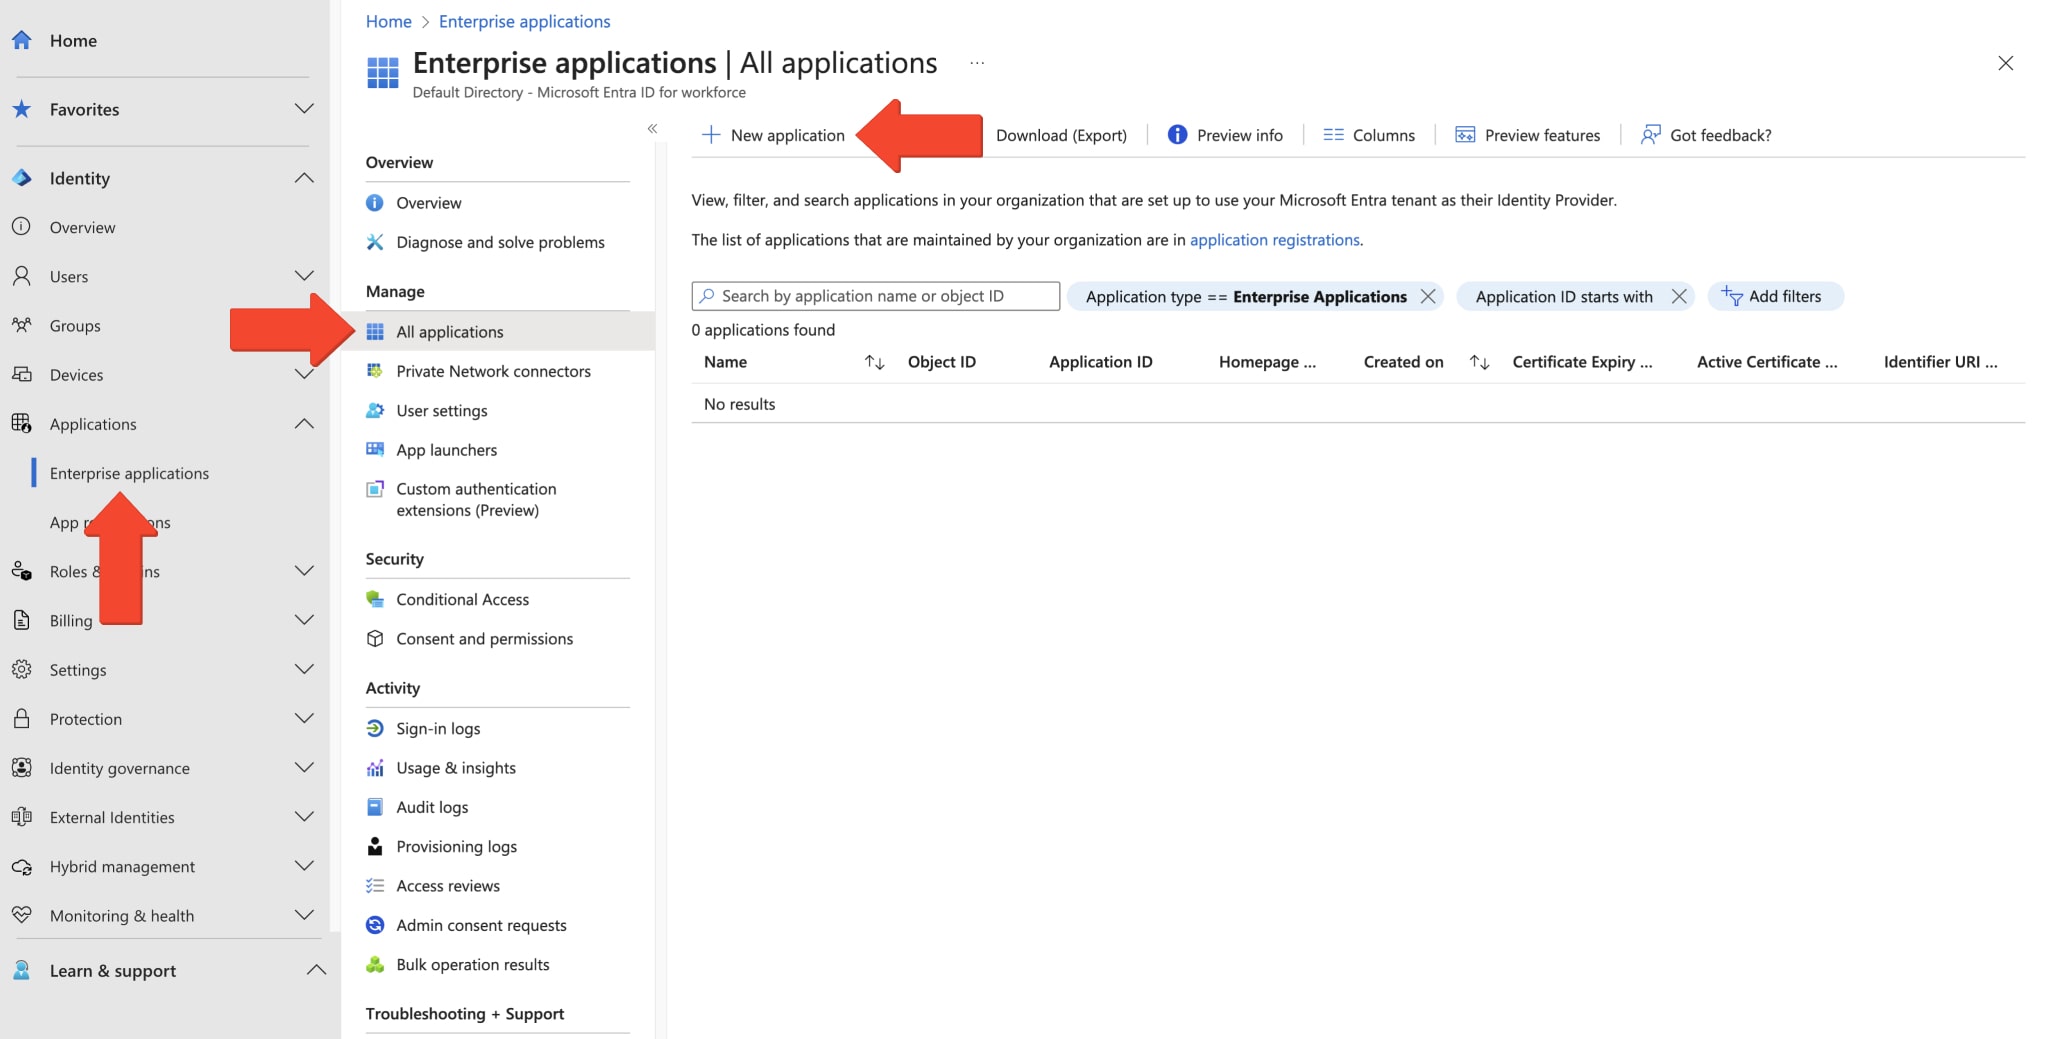
To create a Route4Me Azure SAML integration, create a new application entry in Azure. To add a Route4Me Enterprise Application to your Azure SAML tenant, sign in to the Microsoft Entra admin center as at least a Cloud Application Administrator. Go to “Identity” from the Navigation Menu, select “Applications“, “Enterprise applications” and then, under the “Management” section, select “All applications“. On the “Enterprise applications” screen, click the “New Application” button.
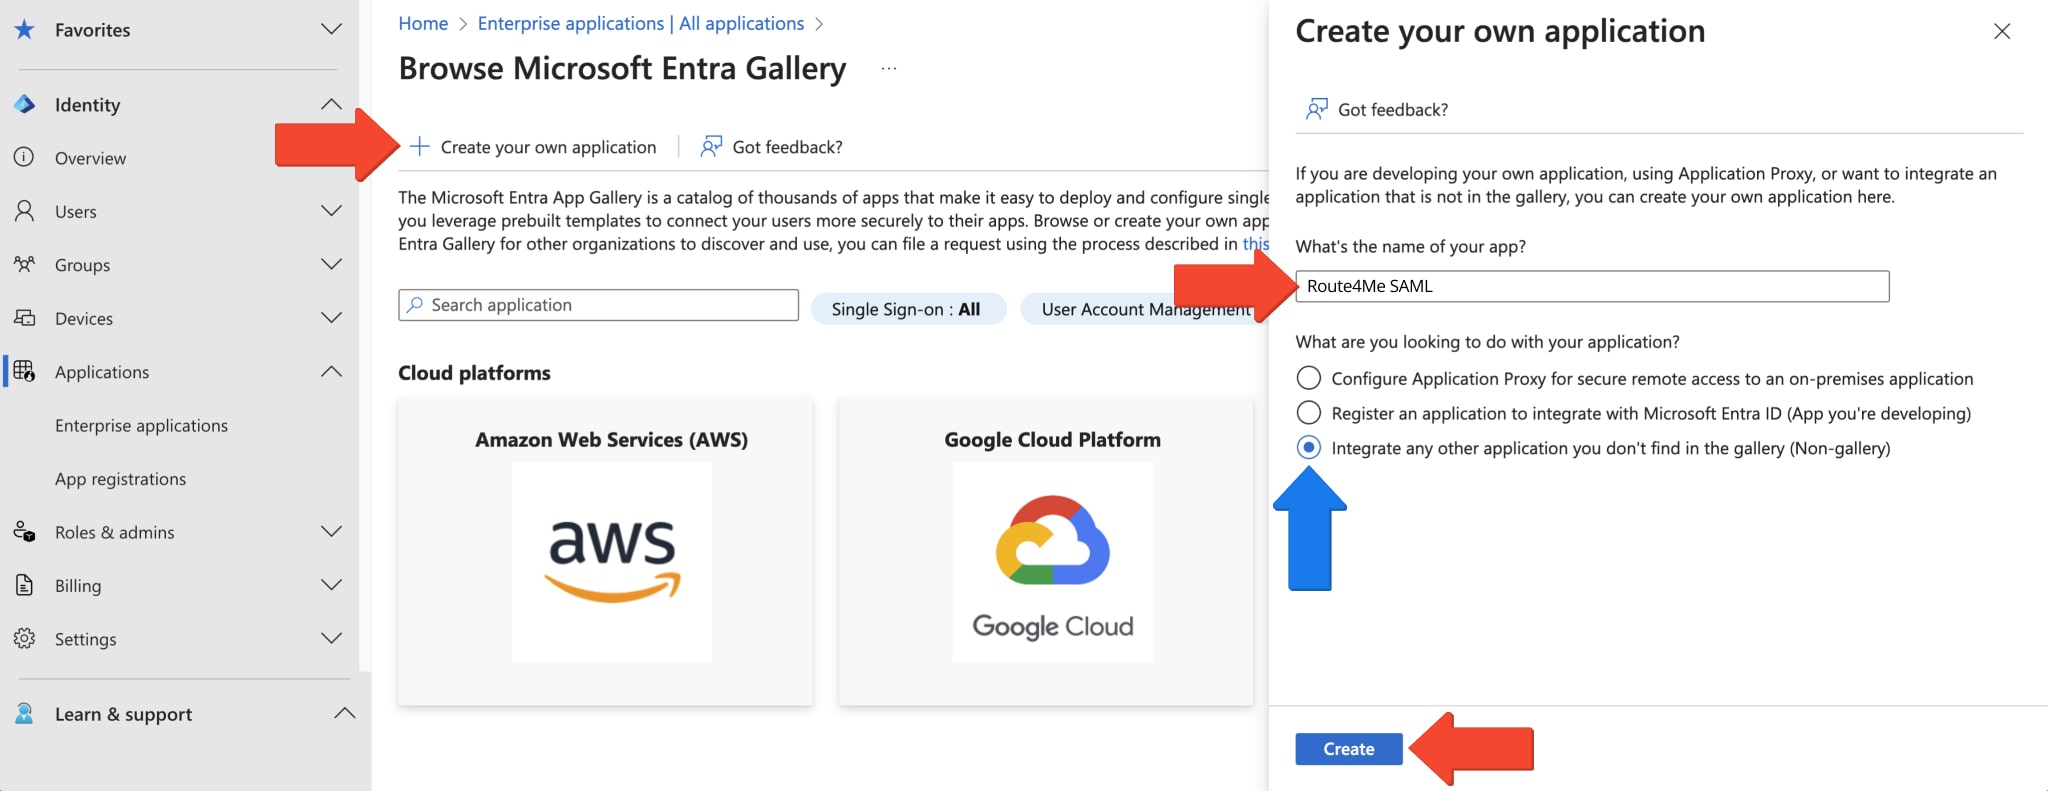
Then, on the “Browse Microsoft Entra Gallery” screen, click the “Create your own application” button. This will open the “Create your own application” panel. Enter a name for your Route4Me Entra ID SAML Integration in the “What is the name of your app” field and click the “Create” button.
Assign Users To Route4Me Azure SAML Enterprise Application
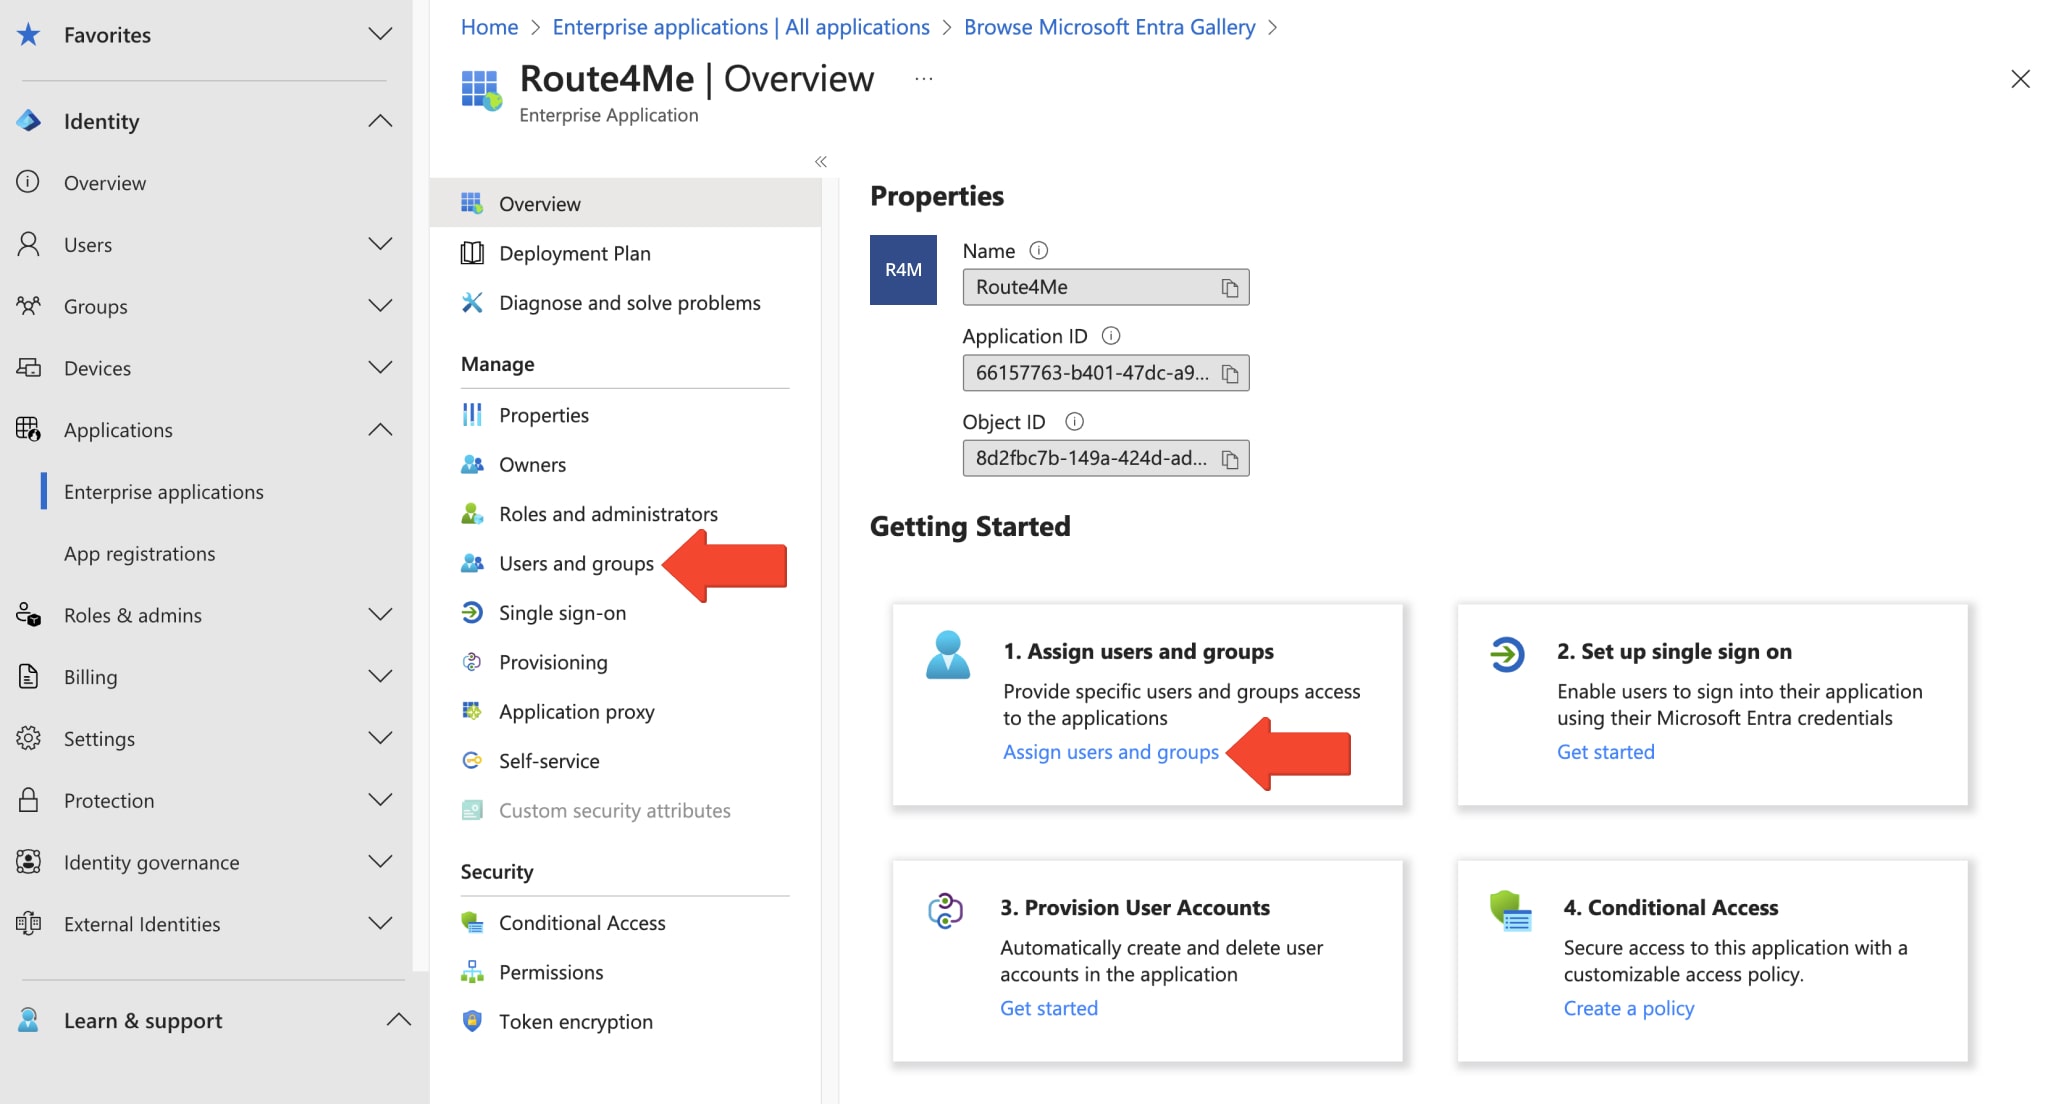
Once your Enterprise Application is created, its respective “Overview” window will open. There, you can view the respective “Application ID” and “Object ID“, as well as execute a variety of functions, such as assigning users and groups to the Enterprise Application. To do so, click the “Assign users and groups” button or go to the “Users and groups” tab from the “Manage” menu.
This will take you to the “Users and groups” tab. There, click the “Add user/group” button to select which users and groups to add. Additionally, you can learn more about adding users and groups to Entra ID Azure. NOTE: If you need to use groups and pass them in the SAML response, your tenant needs to have Entra ID P1 or P2 licenses (formerly Azure Active Directory P1 or P2).

Set Up Route4Me Azure SAML Entra ID SSO (Single Sign-On)
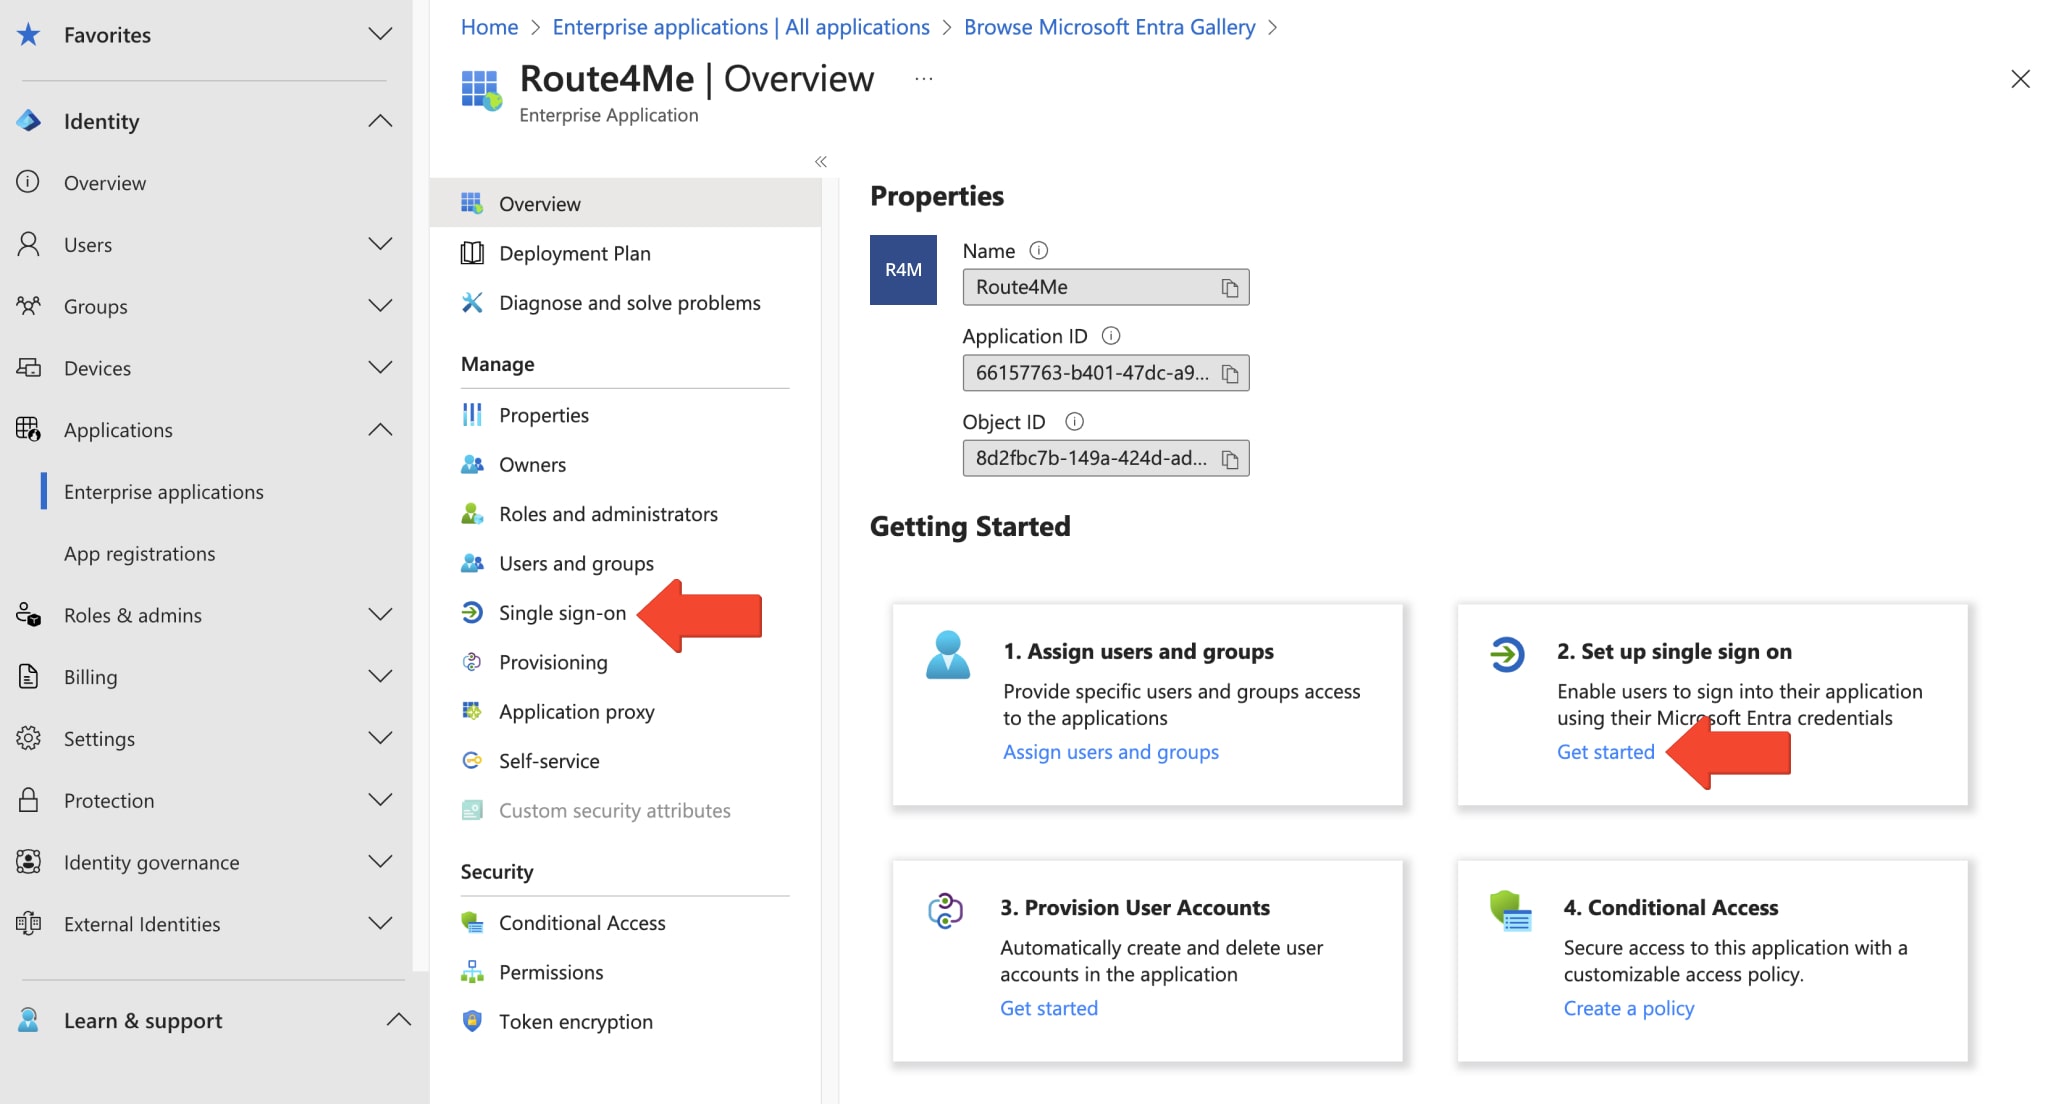
To set up SSO, click the “Get started” button under “Set up single sign on” in the overview window, or go to the “Single sign-on” tab from the “Manage” menu.
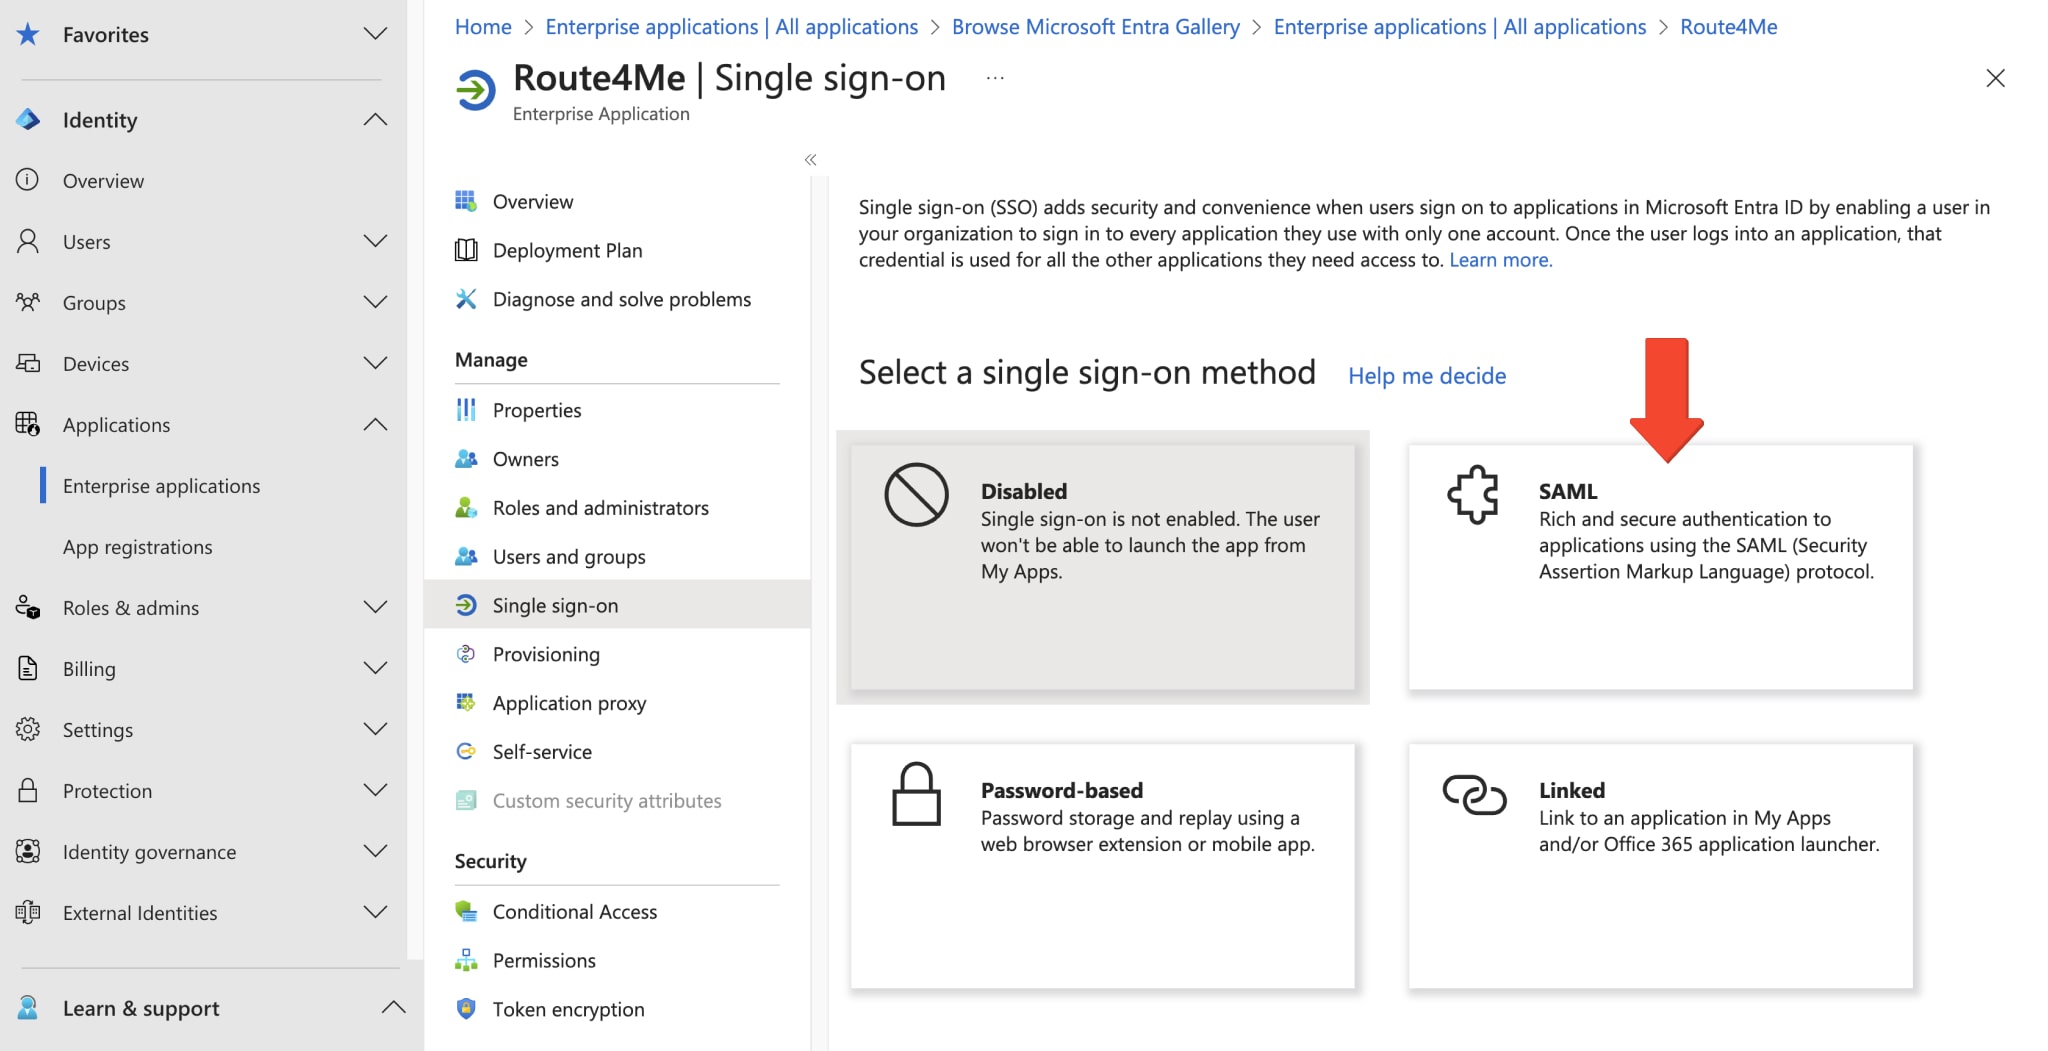
Then, on the “Select a single sign-on method” screen, select “SAML“.
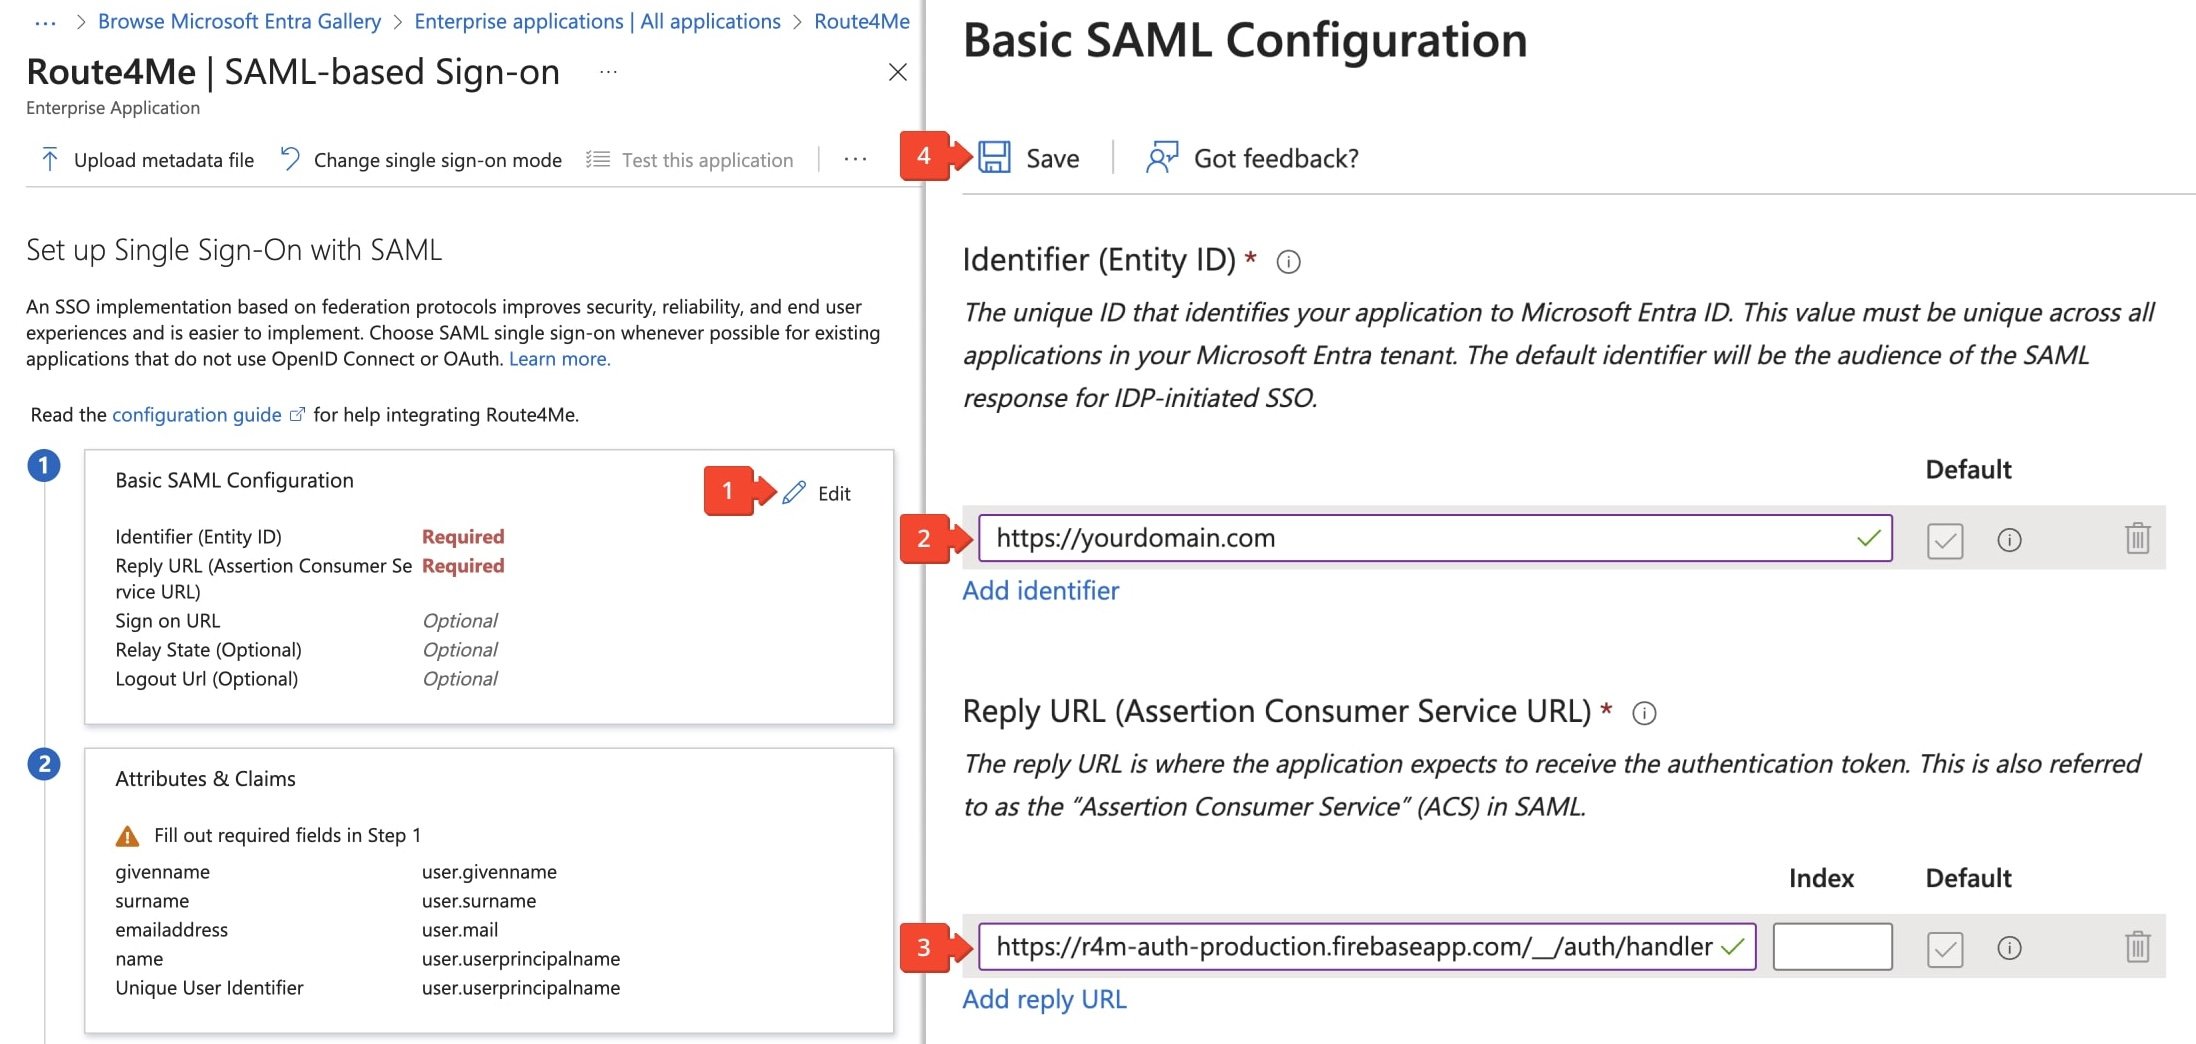
After that, in the “Set up Single Sign-On with SAML” section, click the “Edit” button in the “Basic SAML Configuration” panel. Enter your entity_id in the “Identifier” field, for example, your domain name. Then, in the “Reply URL” field, enter your assertion_consumer_service_url.
NOTE: To ensure that SAML responses and assertions are signed in Entra ID (Azure AD), navigate to the “SAML Certificates” section in your Enterprise Application settings. Ensure that “Signing Option” is set to “Sign both Response and Assertion“.
Finally, click the “Save” button to save your basic SAML SSO settings.
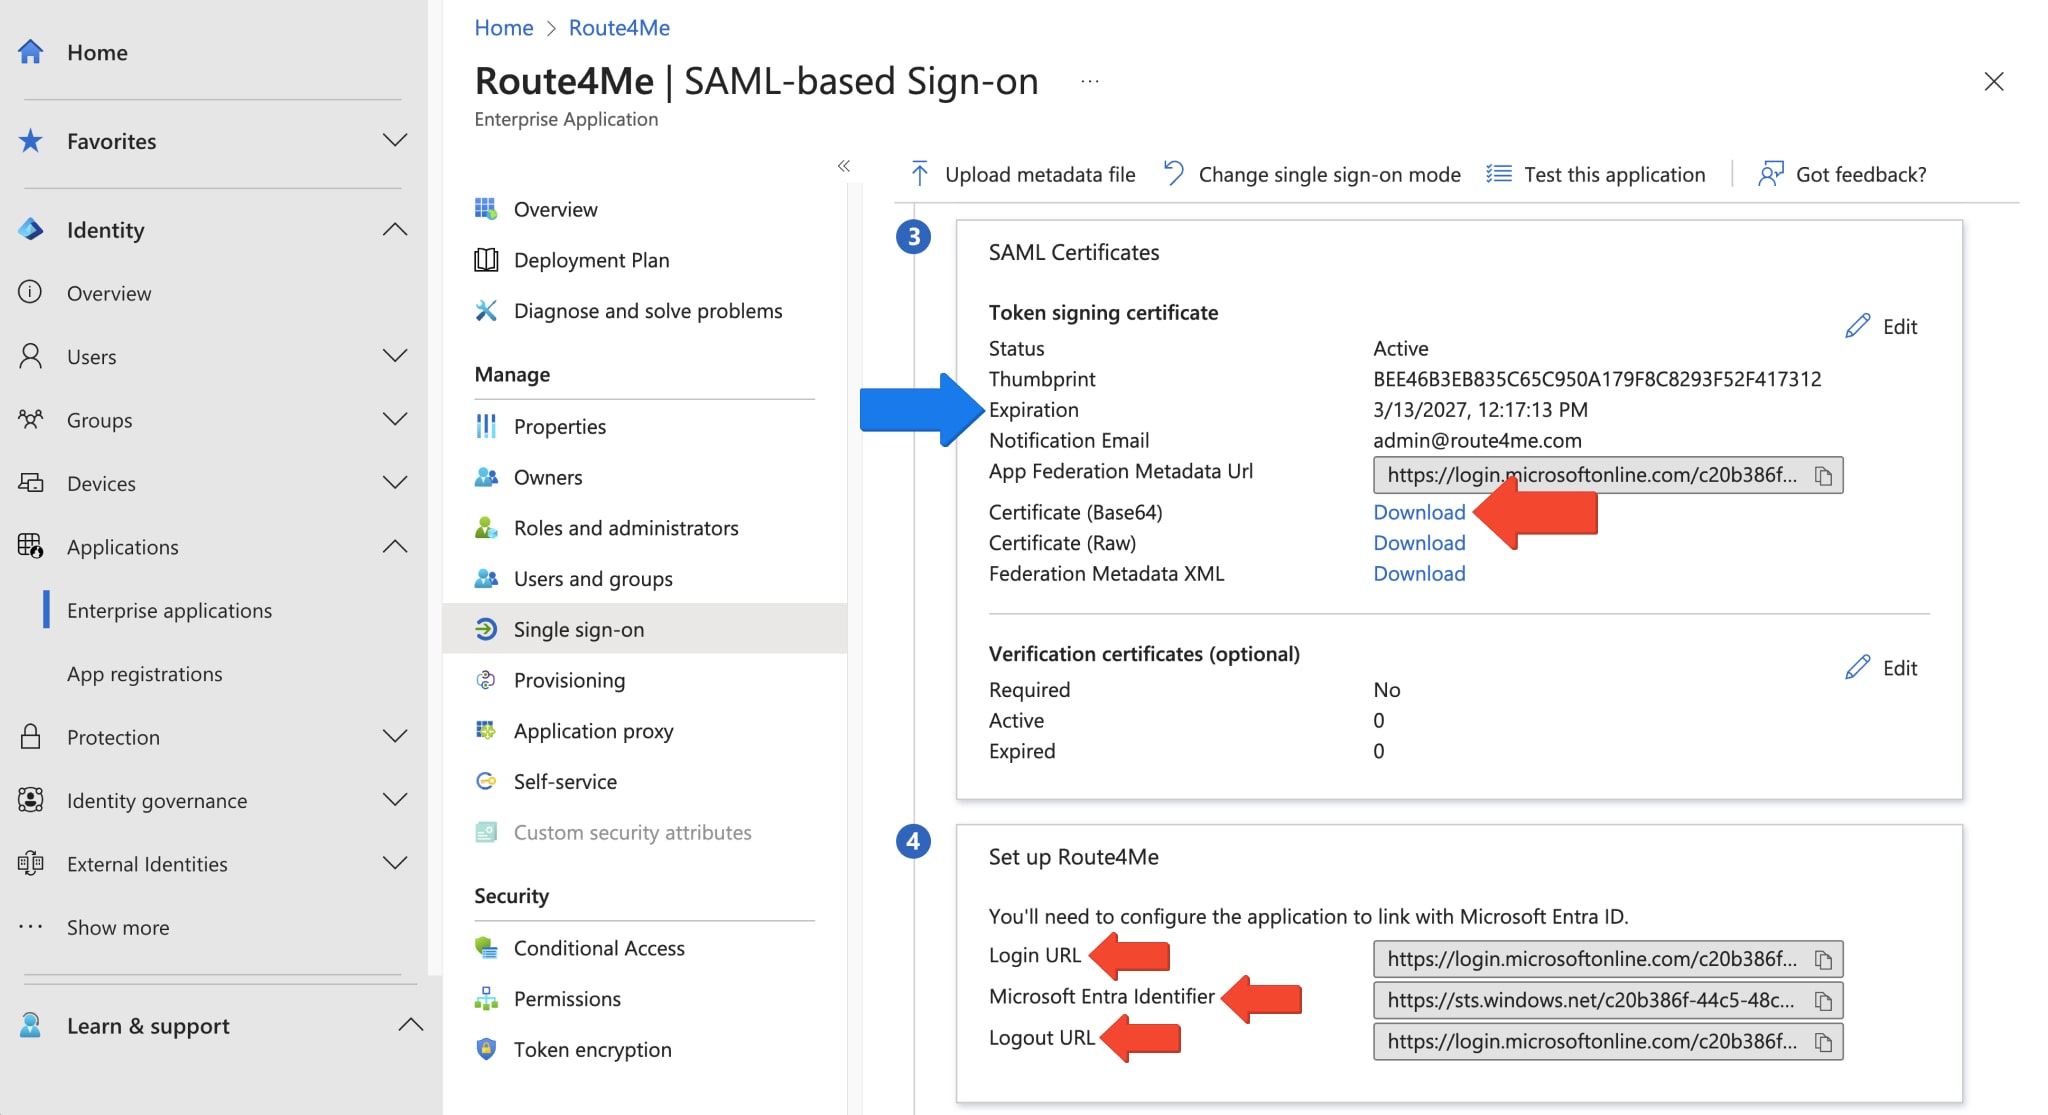
Once you’ve saved your settings, download the SAML Certificate in the Base 64 format by clicking “Download” next to it. Additionally, make note of the certificate expiration date, and whenever required, reissue it. Furthermore, Entra ID Azure will create the following entries for you in the SAML Blade: Login URL, Microsoft Entra Identifier, Logout URL. Record these values.
The information that needs to be shared with Route4Me to create an Entra ID Azure SAML Integration with SSO includes the following:
- Identifier (Entity ID) from the Basic SAML Configuration settings
- x509 Certificate (Base 64) downloaded from the Enterprise application SAML settings
- Login URL
- Microsoft Entra Identifier
- Logout URL